
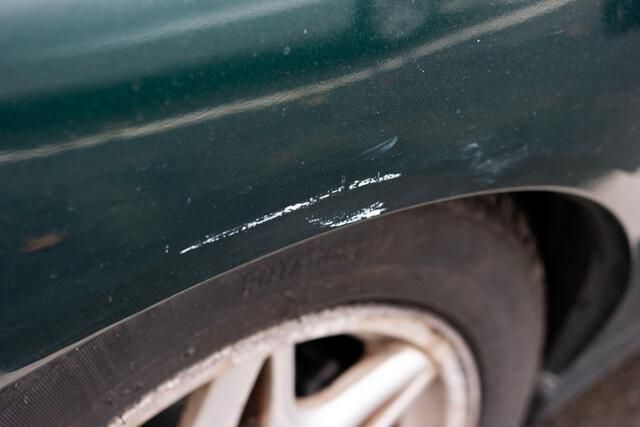
Use clay, mild solvent, and polish to remove the transfer, then seal the area.
Scuffs from another car’s paint look scary, but they’re often only on the surface. Here, I’ll walk you through how to fix paint swap on car like a pro, using safe steps and simple tools. I’ve done this for years in the shop and at home. You’ll learn what works, what to avoid, and when to call a pro.
Source: westchesterdetailing.com
What paint transfer is and why it looks worse than it is
Paint swap (also called paint transfer) happens when another car’s paint rubs onto your clear coat. Most of the time, your paint is fine under the smear. You’re looking at their color sitting on top of your finish.
Think of it like crayon on glass. Remove the crayon, and the glass is fine. The trick is to clean the transfer without grinding your clear coat.

Source: youtube.com
Quick check: transfer or scratch?
Before you start, find out what you’re dealing with. A transfer sits on top and often feels smooth. A scratch cuts into the clear coat and can catch a fingernail.
Try this quick test:
- Run a clean finger across the mark. If it feels raised or chalky, it’s likely transfer.
- If your nail catches and you see white or gray under the color, it may be through the clear.
- Spray water on it. If it almost vanishes while wet, it’s shallow and often easy to fix.
Source: thesoutherneronline.com
What you need
You do not need a body shop for light to medium paint transfer. Gather these:
- Car wash soap, two buckets, and microfiber towels
- Detailing clay bar or synthetic clay mitt with clay lube
- Adhesive and bug remover or tar remover (paint safe)
- 70% isopropyl alcohol mixed 1:1 with water in a spray bottle
- Light to medium cut compound and a finishing polish
- Foam applicator pads or a dual-action polisher with foam pads
- Masking tape, nitrile gloves, and good lighting
- Wax or sealant (spray sealant or ceramic spray)
Tip from the bay: A dedicated paint transfer remover can be handy, but bug and tar remover works in many cases.

Source: youtube.com
Step-by-step: how to fix paint swap on car at home
You can handle most cases in under an hour. Here is how to fix paint swap on car without stress. Work in the shade on cool paint.
Step 1: Prep and clean
- Wash the area with soap and water. Dry with a clean microfiber.
- Tape off trim and edges. This keeps polish off rubber and plastic.
- Wipe with the alcohol mix to strip any old wax. This helps the next steps bite the transfer.
This prep is key for how to fix paint swap on car fast and safe.
Step 2: Loosen the transfer safely
- Spray bug and tar remover on the mark. Let it dwell for 30 to 60 seconds.
- Wipe gently with a soft microfiber in one direction. Do not scrub.
- Repeat as needed. If it fades, you’re on track.
If the transfer is stubborn, a light pass with the alcohol mix can help. Stay calm and keep pressure light. This stage is a big part of how to fix paint swap on car without harming clear coat.
Step 3: Clay the area
- Lube the panel well. Work the clay back and forth with light pressure.
- Check the clay often. If you see color on it, fold it to a clean side.
- Wipe dry and inspect. Many marks are gone after claying.
Clay is gentle and removes bonded paint well. It is a clean step for how to fix paint swap on car when solvents alone do not finish the job.
Step 4: Correct with compound and polish
- Use a pea-sized dot of medium compound on a foam pad.
- Work a 12×12 inch area. Low speed, light pressure, slow passes.
- Wipe and check. If haze remains, follow with a finishing polish.
If you do not have a polisher, use a foam hand pad. Work in small circles with light pressure. This is the part of how to fix paint swap on car that brings back gloss.
Step 5: Protect the finish
- Apply a wax or spray sealant to the area.
- Let it cure as directed. This adds slickness and shields the clear.
A good seal keeps future transfers easier to remove. It also gives you that fresh, slick feel that helps dirt slide off.
To recap, you prepped, loosened, clayed, corrected, and sealed. This simple loop is how to fix paint swap on car the right way.
Source: pbs.org
Advanced fixes for tough or deep marks
Some marks go deeper than the clear coat. You may see primer or even metal. In that case:
- Spot wet sand only if you know how. Use 3000 grit, very light, and only on clear coat.
- Touch-up paint can fill a gouge. Apply thin coats, let cure, then level and polish.
- If the scratch spans a large area or has a jagged edge, seek a pro.
I once fixed a white streak on a black bumper that looked awful. It was all transfer. Clay and a mild compound made it vanish in 20 minutes. That is the magic of how to fix paint swap on car when you know what to look for.

Source: youtube.com
Common mistakes to avoid
- Scrubbing hard with a dry towel. That can add scratches.
- Using harsh solvents like acetone or lacquer thinner. They can melt clear coat.
- Going straight to heavy compound or sandpaper. Start mild and step up only if needed.
- Using a melamine sponge (Magic Eraser) on glossy paint. It can dull the finish fast.
Avoid these, and how to fix paint swap on car will stay low risk and low cost.
Source: synewchemical.com
Aftercare: keep your paint safe and glossy
Good habits make life easy after a repair.
- Wash with a two-bucket method and clean mitts.
- Keep a spray sealant in the trunk. A quick coat after washes boosts protection.
- Park away from tight spots and high-traffic lines when you can.
These simple steps support the work you just did and help with how to fix paint swap on car if it happens again.

Source: youtube.com
Cost, time, and when to call a pro
Most home fixes cost under $60 in supplies and take 30 to 90 minutes. A shop may charge $75 to $250 to remove transfer and polish a panel. Repaint work costs more and takes longer.
Call a pro if you see bare metal, peeling clear, or if the panel has deep gouges. When in doubt, get a quick estimate. Either way, you now know how to fix paint swap on car and can talk shop with confidence.

Source: holley.com
Frequently Asked Questions of how to fix paint swap on car
Can WD-40 remove paint transfer?
It can help loosen transfer, but wash and decontaminate after. Follow with clay and polish for best results.
Will a Magic Eraser work on paint transfer?
It works but is risky. It is abrasive and can dull clear coat fast, so I do not suggest it on glossy paint.
Do I need a machine polisher?
No. You can hand-polish small areas with foam pads. A dual-action polisher saves time and gives a better finish on larger spots.
How do I know if it needs touch-up paint?
If you see primer or metal, it is past the clear coat. Transfer removal will not fill that—it needs touch-up or pro repair.
How long should I wait to wax after polishing?
Most spray sealants can go on right away. If you used touch-up paint, wait until it cures per the product guide.
Conclusion
Paint transfer looks bad, but it is often a simple fix. Clean, loosen, clay, polish, and protect—that is your five-step plan. You now know how to fix paint swap on car with safe tools and smart steps.
Use this guide today on a small mark to build skill and confidence. Want more tips like this? Subscribe, ask a question, or share your before-and-after—we’re here to help.